
 Toll Free:
  Contact Us
Disclaimer: This article is sourced from CaClubindia.
Without further ado, let us begin with the steps to file GSTR 3B. GSTR 3B is a basic summary return that will have to be filed for the months of July and August.
Following are the steps to be followed for the filing of the GSTR 3B:
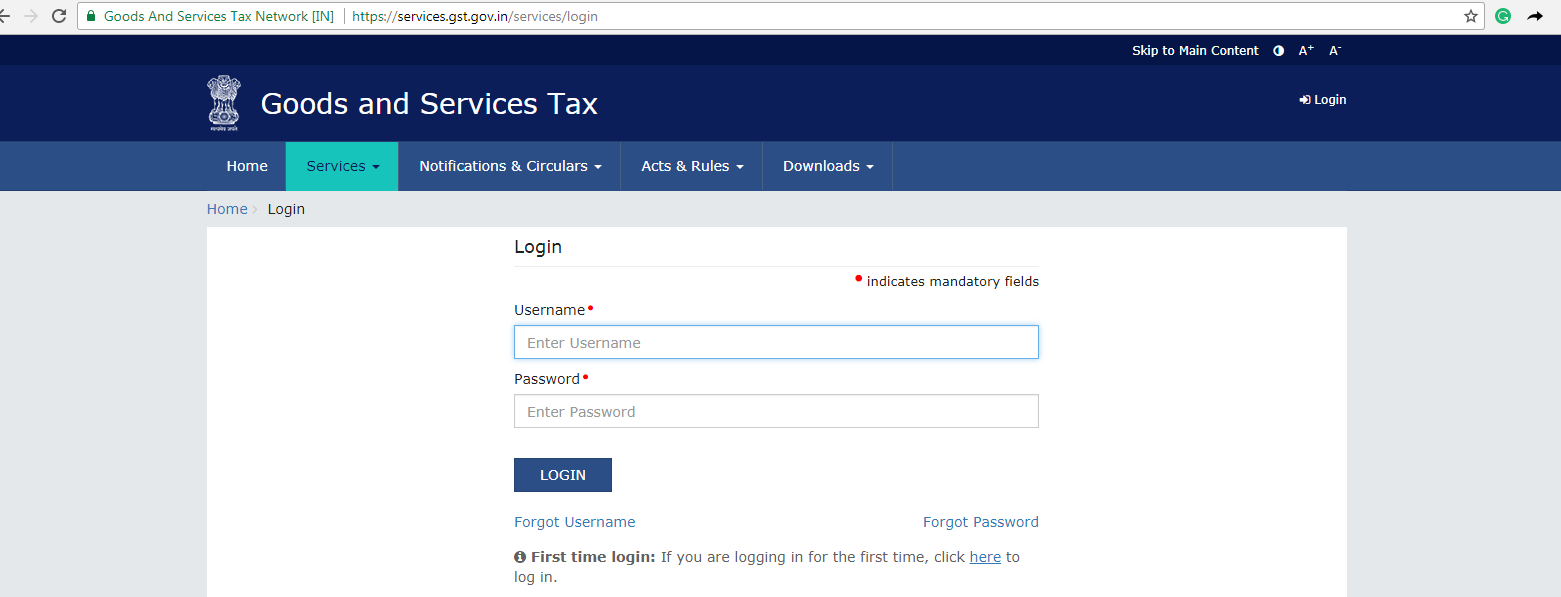
Step 1: Visit the URL www.gst.gov.in .

Step 2: Click on Login. Login with your credentials.
Step 3: Click Services > Returns > Returns Dashboard

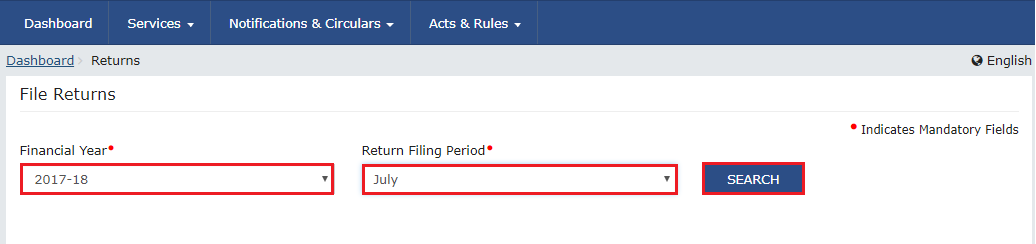
Step 4: The return filing page will be displayed. Select the Financial Year & Return Filing Period (Month) for which you want to file the return from the drop-down list and click on the Search button.
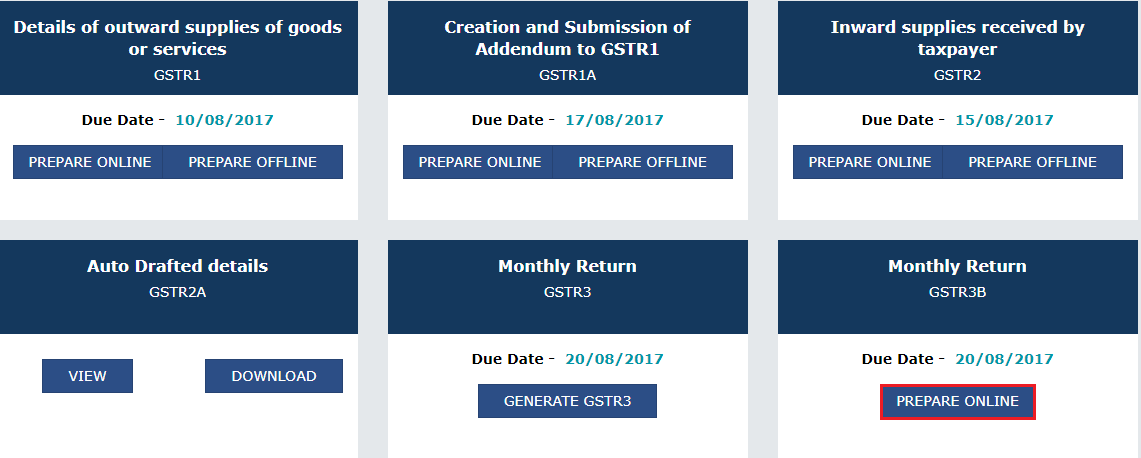
Step 5: The return page is displayed, wherein GSTR 1, GSTR 2 and GSTR 3 are present. In the GSTR3B box, click the PREPARE ONLINE button.
Step 6: On clicking, GSTR 3B monthly return filing page is displayed.
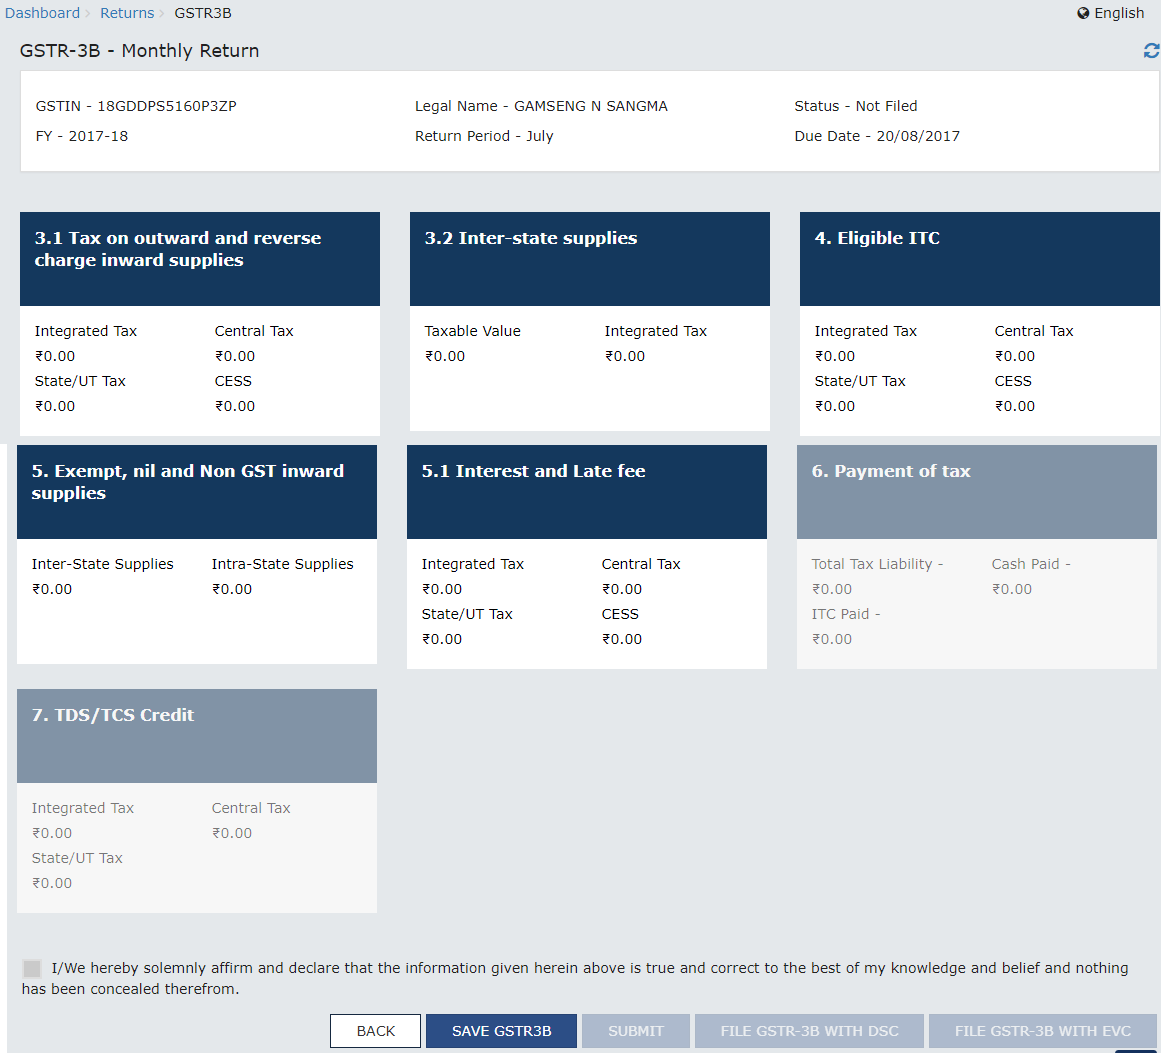
Step 7: There are separate blocks on that page. Choose the relevant block and click on them to feed in the details:
(Block 3.1) Tax on outward and reverse charge inward supplies
(i) Click on the Tax on outward and reverse charge inward supplies block. Enter the total taxable value, Integrated Tax, Central Tax, State/UT Tax and Cess under respective nature of supplies column. In the case of other outward supplies (Nil Rated, exempted ) and Non-GST outward supplies, the total taxable value implies the total values of such supplies, excluding taxes.
(ii) Click on the Confirm button.
You will be directed to the GSTR3B landing page and the 3.1 Tax on outward and reverse charge inward supplies tile in GSTR3B will reflect the added data in a summary form. The taxpayer is advised to click on SAVE GSTR3B button at the bottom to save the data in the GST system, if he wants to exit at this stage and come back later to complete the filing.

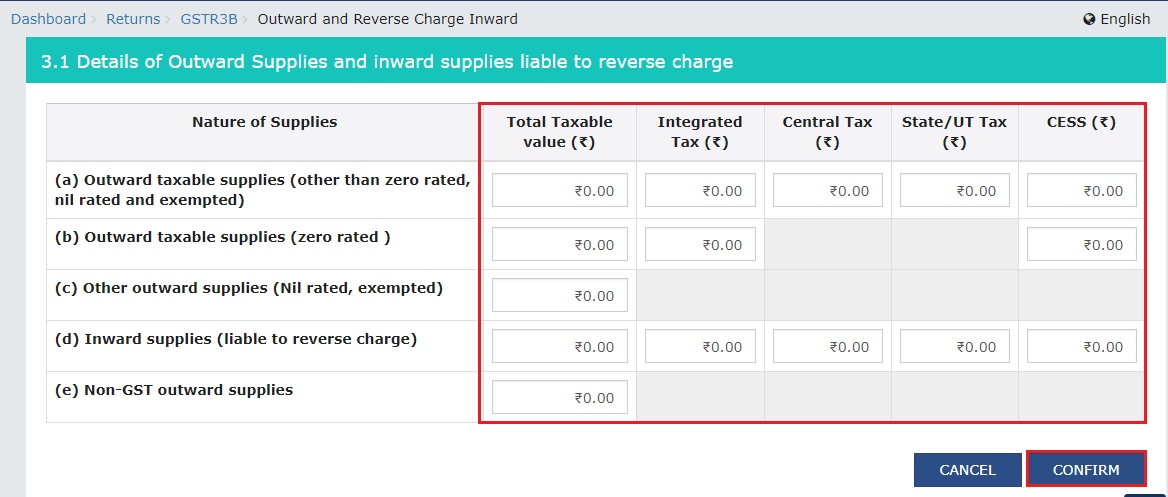
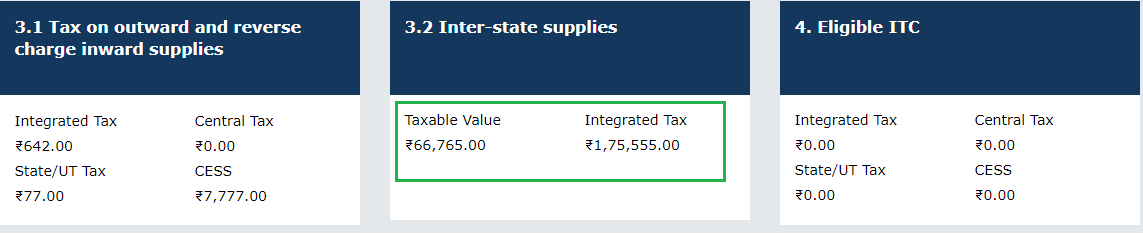
(Block 3.2) : Inter-State Supplies
(i) Click on this block.
Supplies made to unregistered persons:
(a) From the place of supply drop down, select the place of supply (State/UT).
(b) Enter the total taxable value for each state in the “Total Taxable Value” field.
(c) In the “Amount of Integrated Tax” field, enter the amount of Integrated Tax. Please ensure that the integrated tax amount provided here does not exceed the integrated tax liability declared at (a) row in Table-3.1. Only integrated tax amount has to be declared, cess amount is not required to be mentioned. “Add’ and ‘remove’ button can be used for adding or removing data. Please note that export details will not be entered here.
Supplies made to Composition Taxable Persons:
Follow the same steps as above.
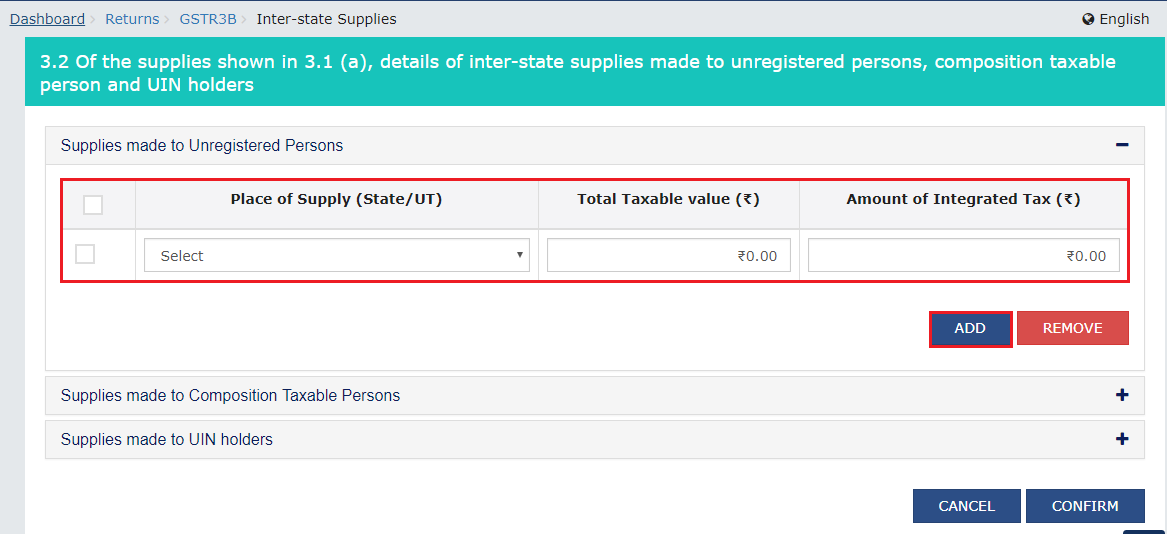
Supplies made to UIN holders:
Follow the same steps as above.
(ii) Click CONFIRM once all details have been fed.
You will be directed to the GSTR3B landing page and the 3.2 Inter-State supplies tile in GSTR3B will reflect the total of taxable value and integrated tax as declared in the details table.
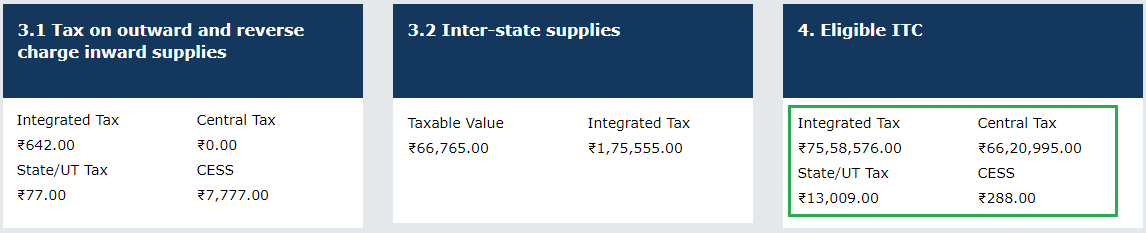
(Block 4) : Eligible Input Tax Credit (ITC)
(i) Click on this block.
(ii) Enter the IGST, CGST, State/UT Tax and Cess values under respective ITC Cliamed/reversed/ieligible heads
(iii) Confirm the details

You will be directed to the GSTR3B landing page and the 4. Eligible ITC tile in GSTR3B will reflect the total value of Integrated Tax, Central Tax, State/UT Tax and Cess net ITCs. The taxpayer is advised to click on SAVE GSTR3B button at the bottom to save the data in the GST system, if he wants to exit at this stage and come back later to complete the filing.
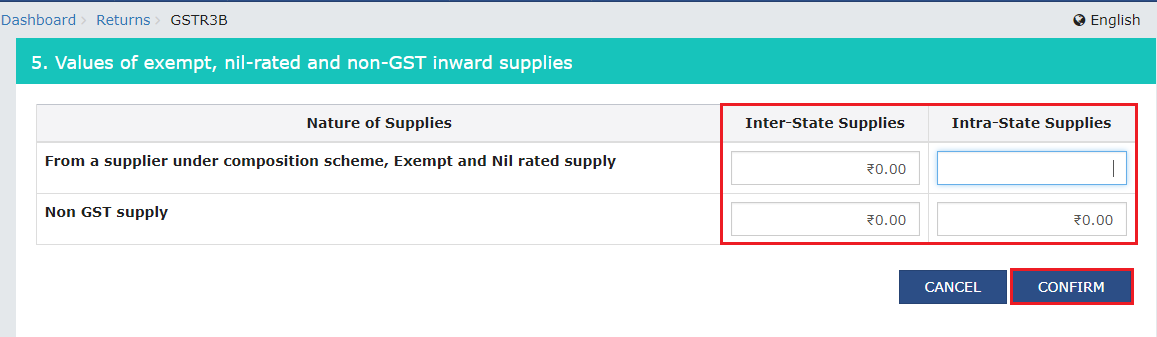
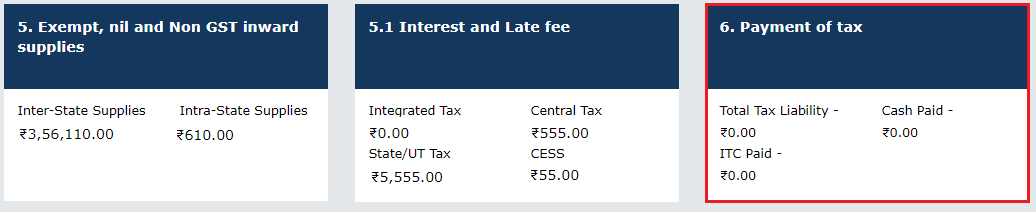
(Block 5) : Exempt, nil and Non-GST inward supplies
(i) Click on this block. Enter the Inter-state and Intra-state supplies under respective Nature of Supplies head
(ii) Confirm the details
Now, when you visit the landing page, the details will be further updated.
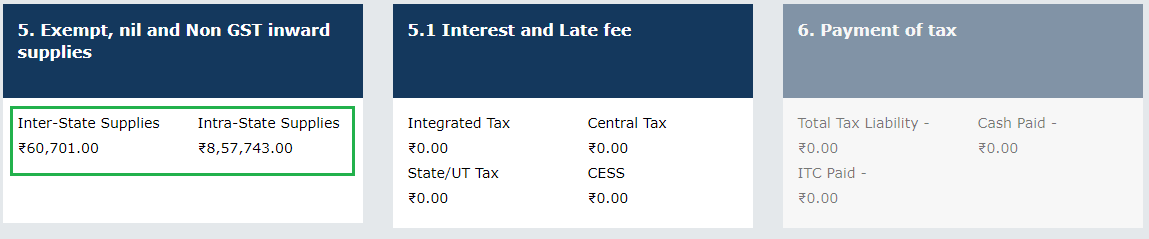
(Block 5.1) : Interest and Late Fee
(i) Click on this block.
(ii) Enter the IGST, State & UTGST taxes and late fees, if any.
(iii) Confirm the details
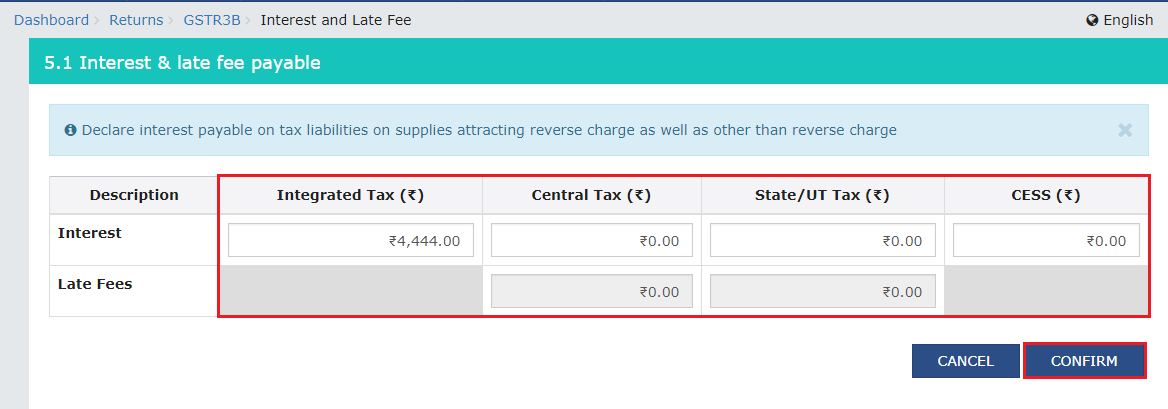
Now, when you visit the landing page, the details will be further updated.

Step 7: Once all details are added, click the SAVE GSTR3B button at the bottom of the page to save the GSTR3B details.
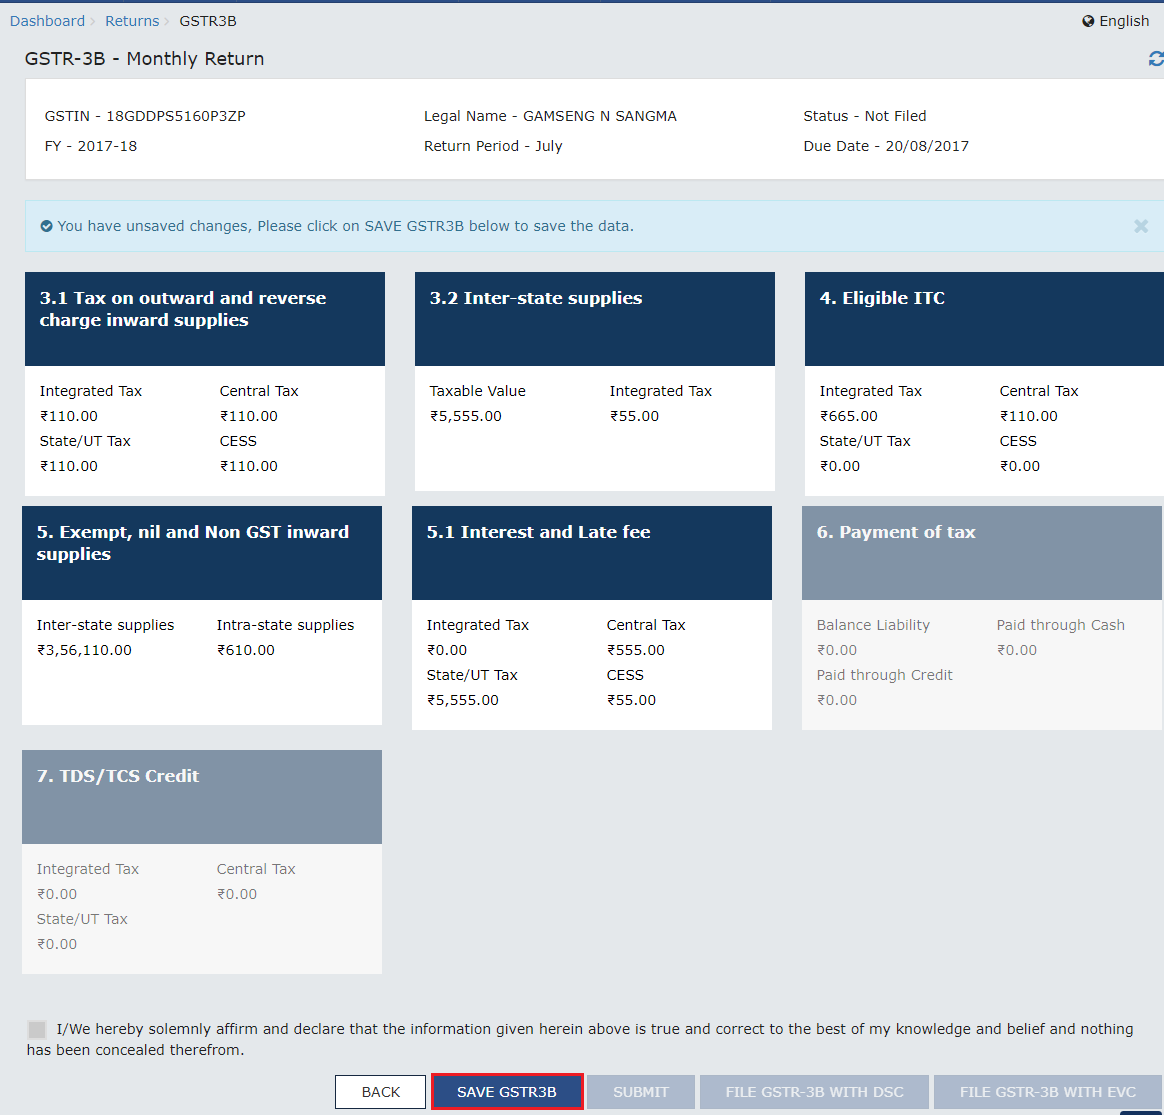
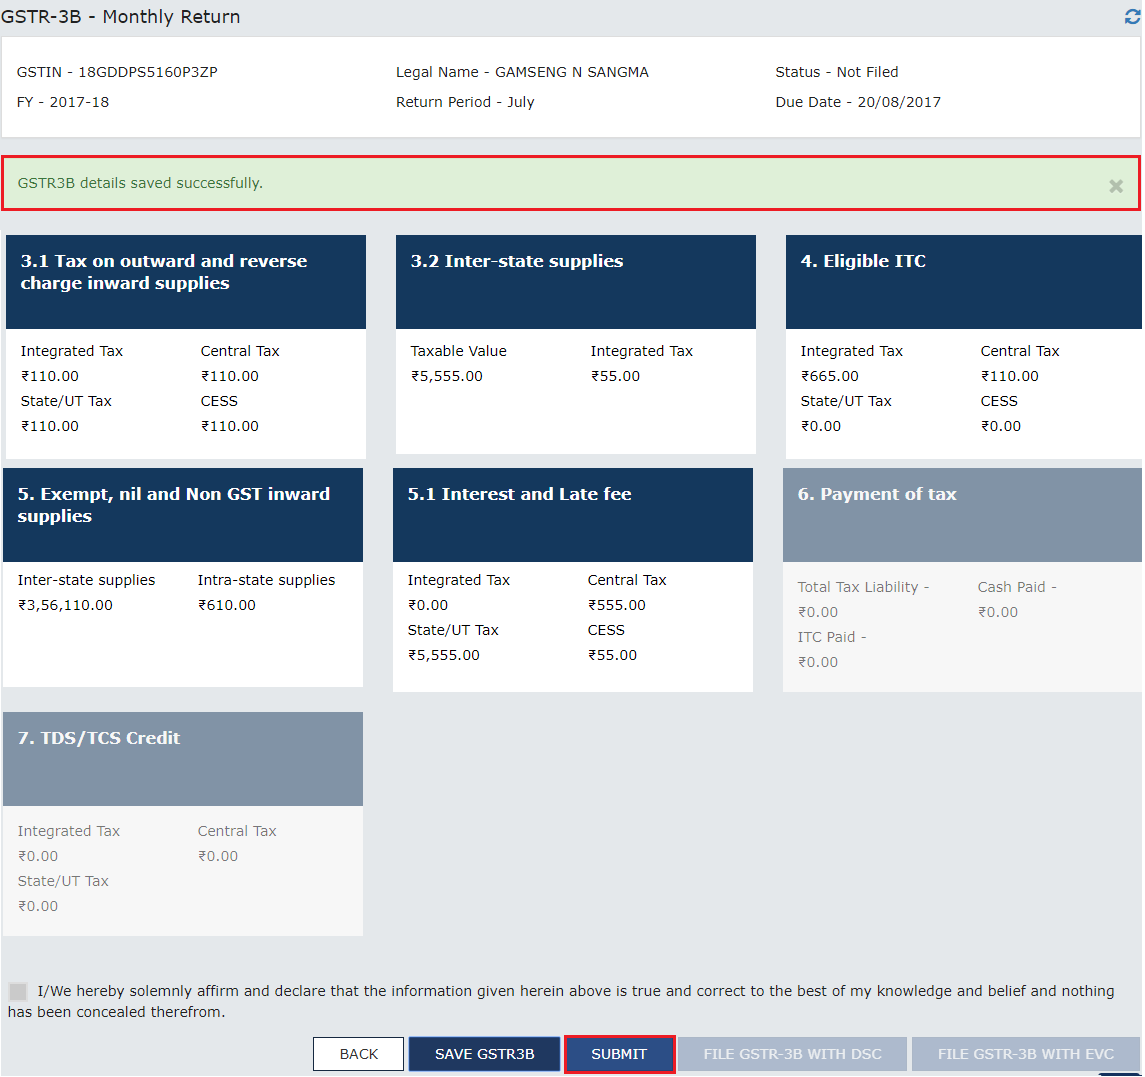
A success message is displayed on the top of the page that the data has been added successfully. The taxpayer is advised to save if he wants to exit after partially entering the data. Once all the details are saved, SUBMIT button at the bottom of the page is enabled.
Step- 8: Scroll down the page and click the SUBMIT button to submit the GSTR3B.
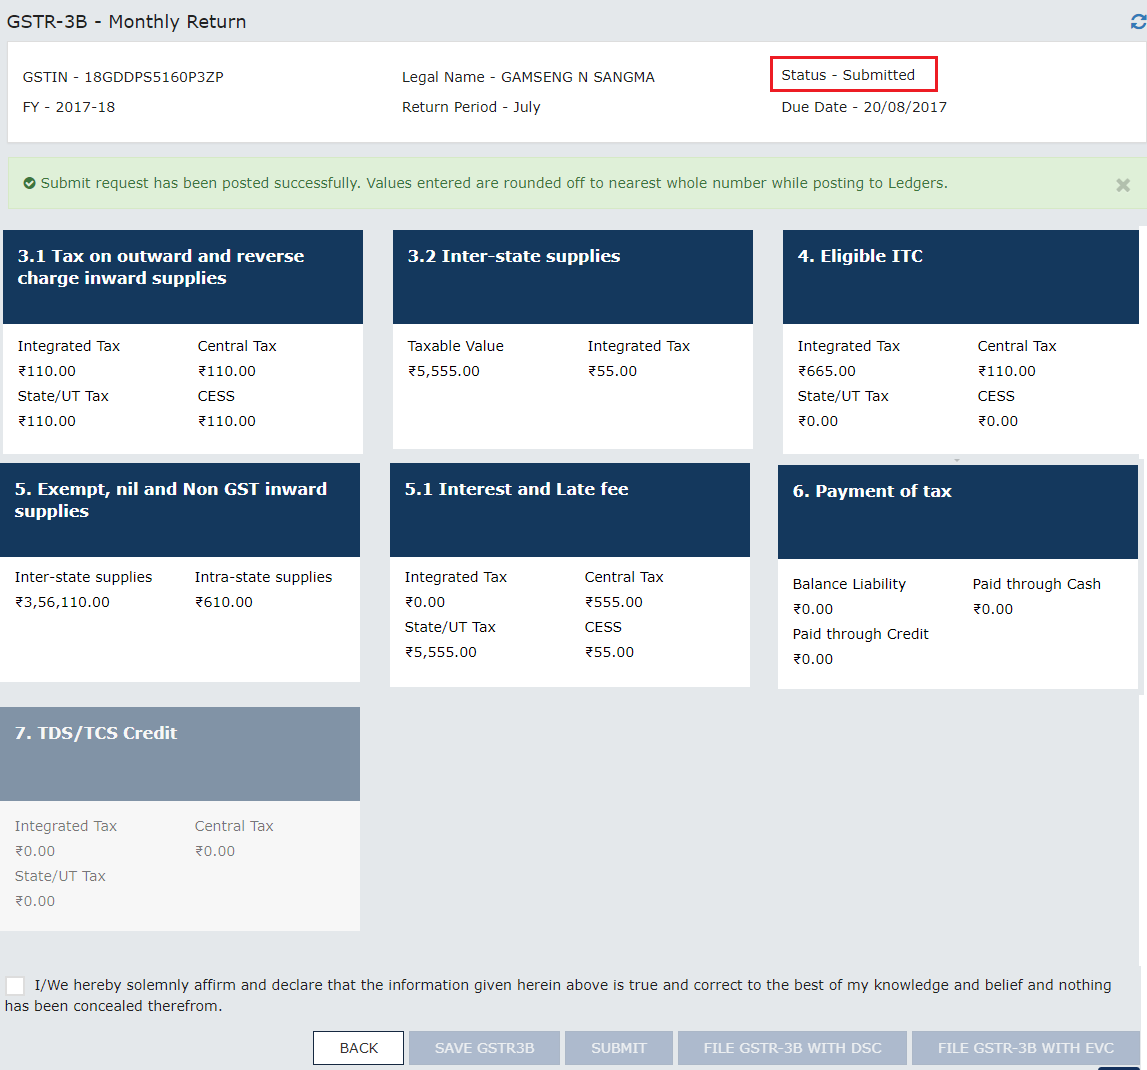
Step- 9: A success message is displayed at the top of the page that the GSTR3B is submitted successfully. Once you submit the data, data is frozen and you cannot change any fields in this return. The ITC and Liability ledger will get updated on submission.
Status of the GSRT3B is changed to Submitted.
(Block 6): Payment of tax
(i) Click on the block.
Tax liabilities as declared in the return along with the credits gets updated in the ledgers and reflected in the “Tax payable” column of the payment section. Credits get updated in the credit ledger and the updated balance is available and can be seen while hovering on the said headings of credit in the payment section.
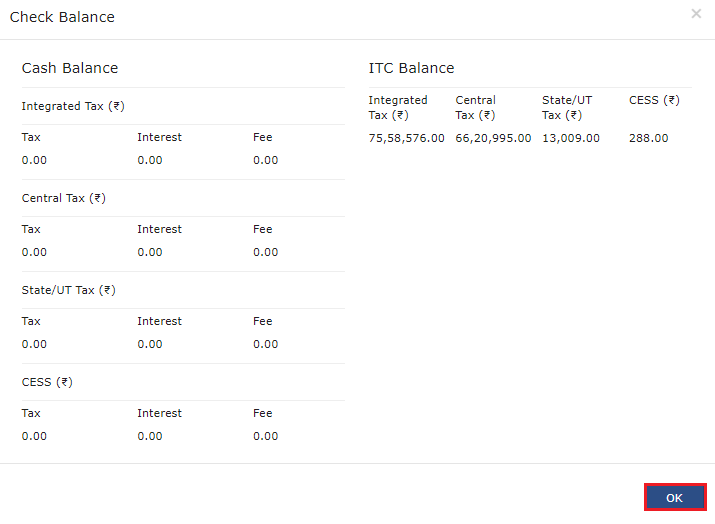
(ii) Click the CHECK BALANCE button to view the balance available for credit under Integrated Tax, Central Tax, State Tax and Cess. The functionality enables the taxpayers to check the balance before making the payment for the respective minor heads.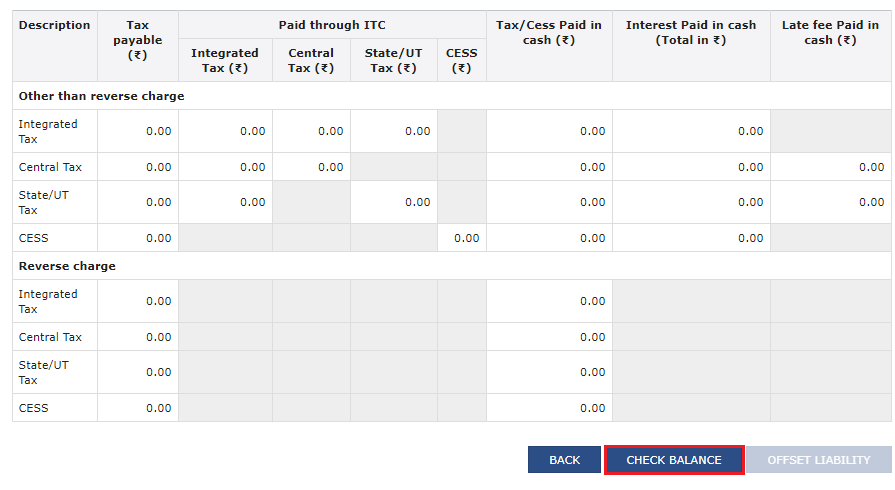
The Check Balance page is displayed. The page lists the minor head wise balance available as ITC and Cash Balance. Click the OK button to go back to previous page.
 (iii) Please provide the amount of credit to be utilized from the respective available credit heads to pay off the liabilities, so as the cash.
While providing the inputs please ensure the utilization principles for credit are well adhered otherwise system won�t allow for offset of liability.
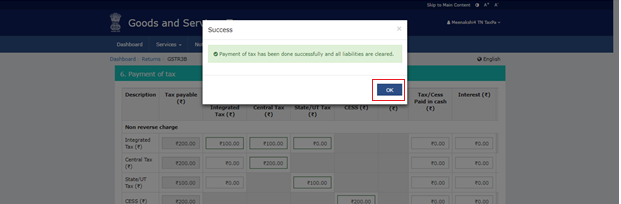
(iv) Click the OFFSET LIABILITY button to pay off the liabilities.
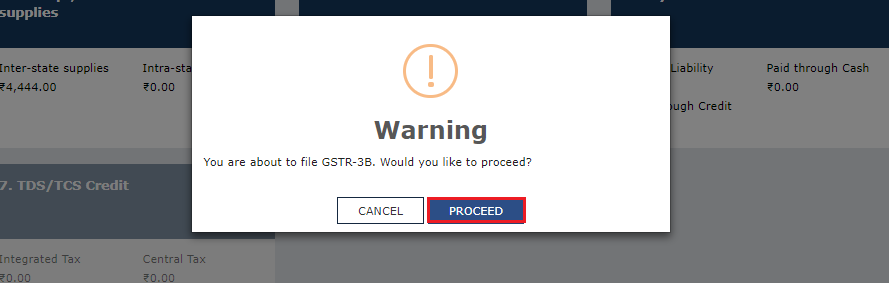
A confirmation message is displayed. Click the OK button.
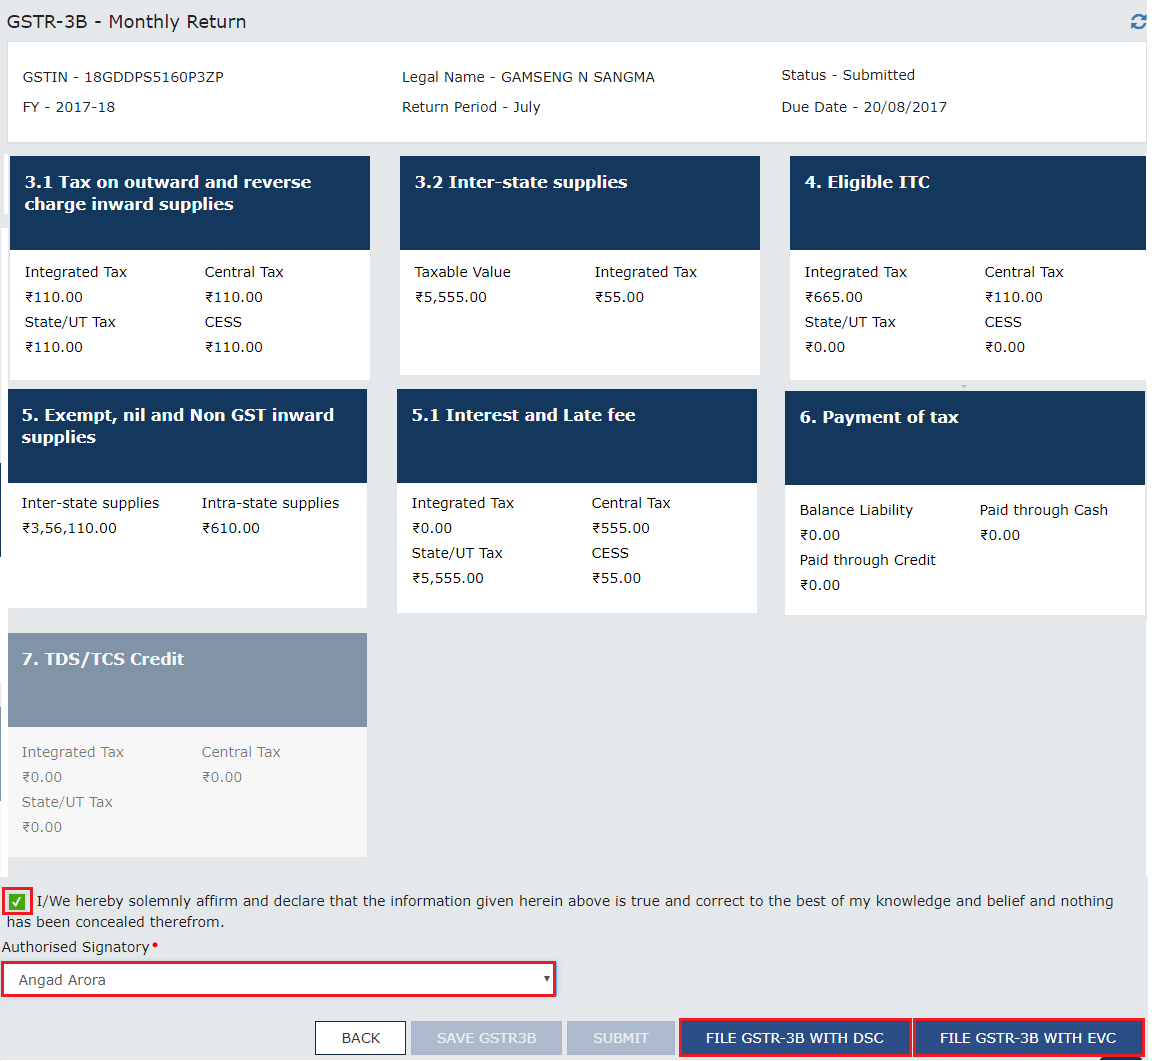
Step-10: Select the checkbox for declaration
Step-11: From the Authorized Signatory drop-down list, select the authorized signatory
Step- 12: Click the FILE GSTR-3B WITH DSC or FILE GSTR-3B WITH EVC button
FILE GSTR-3B WITH DSC:
a. Click the PROCEED button.
b. Select the certificate and click on the sign button.
FILE GSTR-3B WITH EVC:
a. Enter the OTP sent on email and mobile number of the Authorized Signatory registered at the GST Portal and click the VALIDATE OTP button.
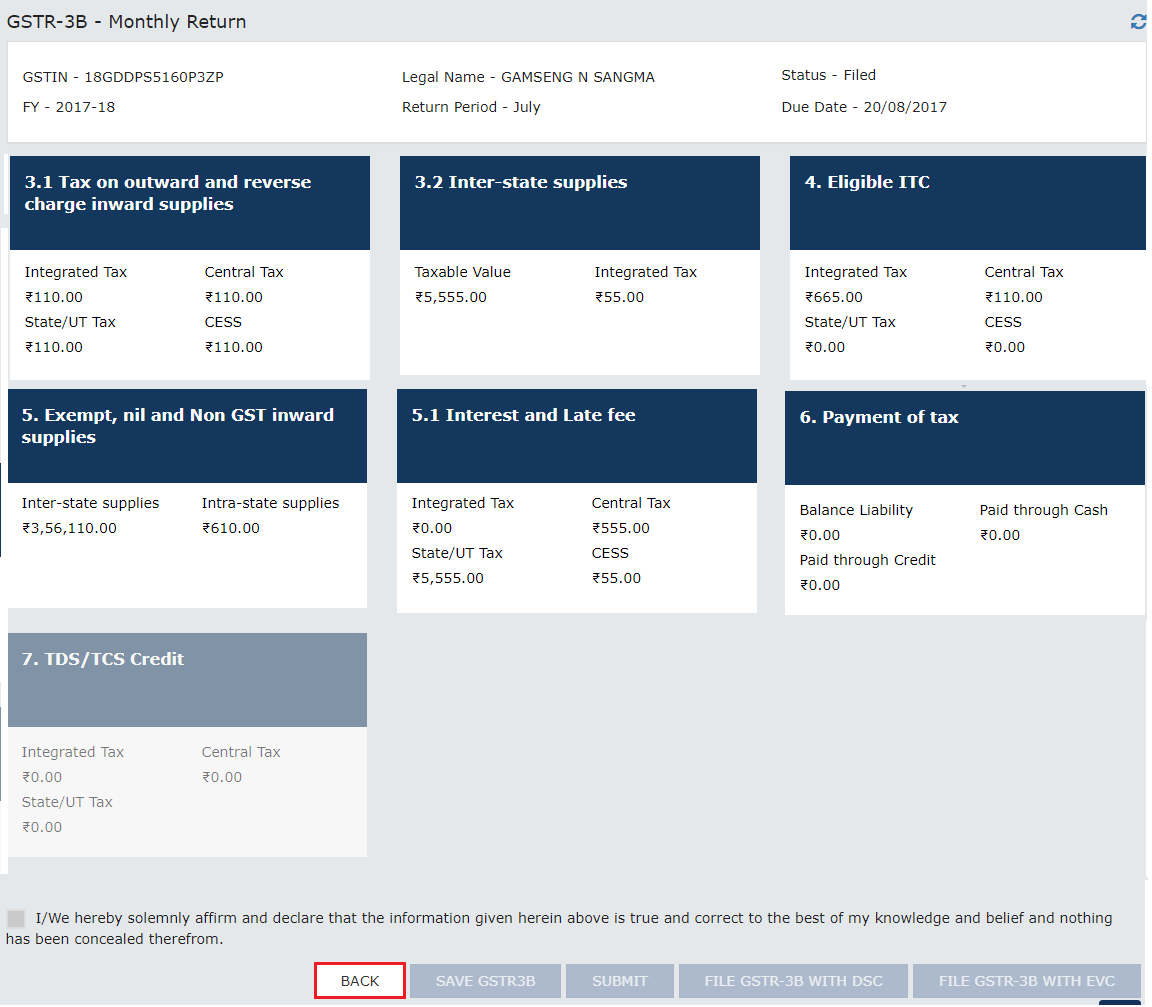
Step -13: The success message is displayed. Click the OK button.

Step-14: Scroll down the page and click the Back button
Step – 15: The File Returns page is displayed. Select the Financial Year & Return Filing Period (Month) for which you want to view the return from the drop-down list
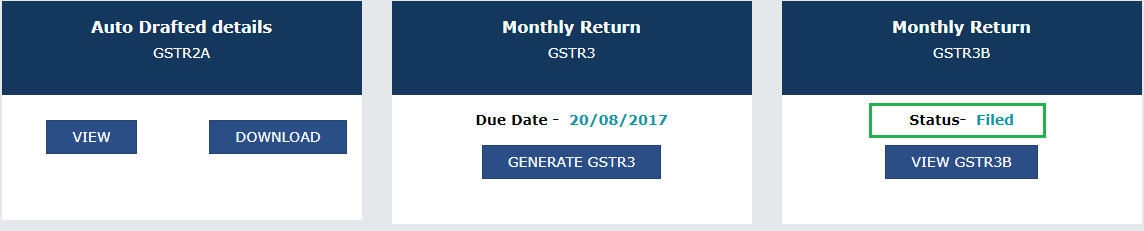
Step-16: Click the SEARCH button. Status of the GSTR3B return changes to “Filed”. You can click the VIEW GSRT3B button to view the GSRT3B return.
Government has also released this comprehensive video on GSTR 3B filing. Click HERE to vew the same.